So, you’ve got your fancy new Madcatz Street Fighter IV Standard Fightstick (either because the Tournament Edition was sold out, or you’re the tinkering or budget-minded sort), and now you want to customize it a bit, maybe add a bit of your own spirit and identity, to help your eighty dollar joystick show that you too are a unique and individual flower.
The first thing you’ll want to do, even if you don’t really give a damn about the whole unique and individual thing, is replace the buttons. The stock Madcatz buttons are lousy (there’s a reason it’s $70 cheaper than the TE stick), and new Sanwa or Semitsu buttons are only a couple buck apiece. If you’re especially inclined, you can also replace the entire stick, or simply swap out the balltop or restrictor gate. I’m not gonna go into the hardware modding here, SRK forum member Sileighty’s Fightstick modding FAQ does an excellent job of giving you the info you’ll need for that stuff.
On to the art.
What you’re gonna need:
- A straight edge
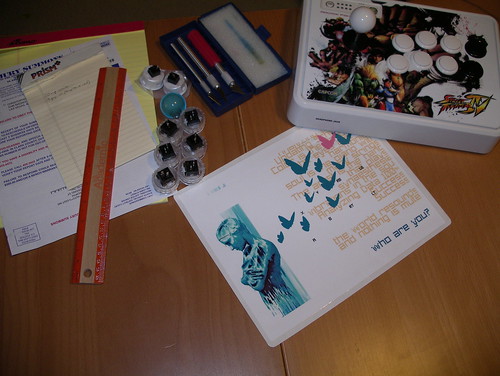
- Hobby knives – these are essential, and cheap. That three pack in the picture was fifteen bucks at the local hobby store.
- Small Phillips screwdriver
- A spudger. I’ve raved about spudgers before, but I’ll say it again. If you do any sort of screwing around with plastic hardware, get one of these.
- Hopefully not a jury summons like I have in the photo above. Stupid civic duty.
- Your replacement art. I’ll talk about that next.
Your replacement art.
First thing you’ll need is a template. Thankfully, Madcatz has made one available.
The second thing you’ll need is a design. Barring talent in that sort of endeavor, railroad a friend into doing it for you. Barring friends, go through this SRK template thread, you may find something to your liking.
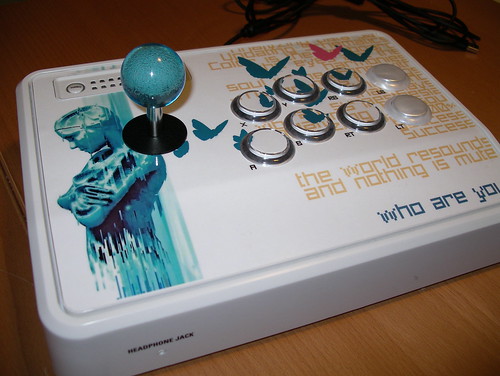
Here’s my finished template. Note the borders and cutout holes… while they give you a guideline during design, be sure to turn those layers off before printing the art.

Next up is printing your template. Actual size, the template will print just fine on a standard sheet of paper, so don’t worry if anything is clipped — it’s just the edges of the cutout area. Naturally, you’ll want to use the best printer and paper you can find, or you can have the folks at Kinko’s print the art before they apply the Lami-Label. Yeah, you’ll need to find a Kinko’s (or comparable) for this next part.
The Lami-Label.
Lami-Label is magical stuff. The Kinko’s tech will slide your printed template into what’s basically a laminate pouch and run it through a machine that heats up and seals the whole bit, leaving you with a laminated printout with adhesive on one side, basically a giant sticker. Pretty neat, cheap (only a few bucks) and fairly durable.
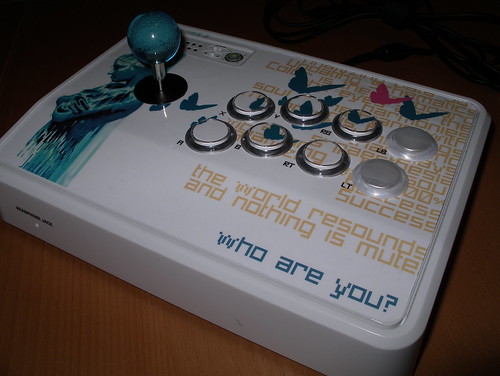
Okay, let’s put on some art.
Remove the six screws from the underside of the Fightstick case, and remove the bottom plate. Remove the joystick and buttons (again, the guide for that). Here’s a shot of the underside, for reference:
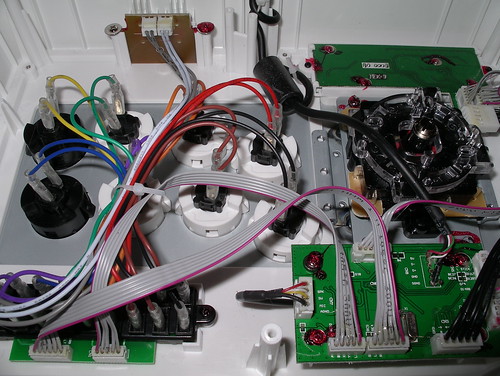
Remove the rest of the internals, or not. If you leave em in there, be careful during the rest of this, if you take em out, don’t forget what goes where.
Pro tip: One corner of the metal joystick mount is awfully close to the A button, which’ll make tightening the nut of a screw-on button a pain. Either use a snap-in button, or dremel the corner back slightly.
Peel away the original art, taking care not to scratch up the surface of the case (spudger!). Removing the original art will result in a cleaner final application, and most importantly, it exposes the screws underneath.
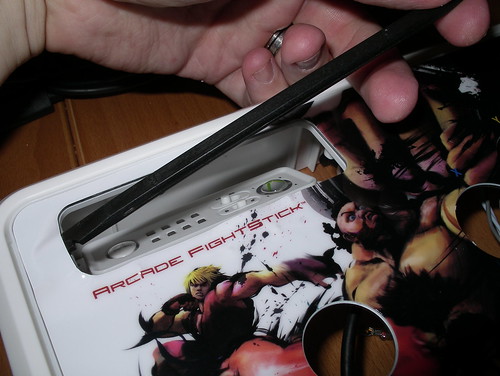
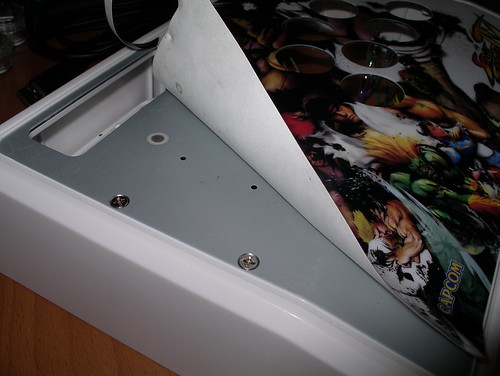
Remove the five screws holding the upper plate to the body.

Using the hobby razor and ruler, trim the outer edges of your printed template, giving you something to align against the upper plate. Remove the adhesive’s backing, and carefully apply your artwork to the plate, using the edges as a guide. Be wary of air bubbles, as they’ll be a pain and/or impossible to remove if you don’t catch them now. Also, don’t seal the upper edges too firmly, as you’ll be lifting them again after the next step.
Unfortunately, I didn’t take a picture of this part, so here’s a shot of my pet pigeon instead:
Pro tip: Were I to do this again, I’d go with a wet application, spraying down the plate with Windex or slightly soapy water first and then applying the art, similar to the way you’ll see guys tint windows. This gives you more of a chance to arrange the art without immediate adhesion (it’ll slide around until the water underneath dries or is squidgeed out). Thing is, I dunno how well the lami-label would react to a wet application, so if one of you wants to try it, let me know.
Next, we’ll trim out the holes. With the artwork applied, flip over the plate and place it on a safe surface that can be cut on and won’t scratch up your art. A slab of cardboard is perfect.
Using the hobby razor, cut out the button and accessory holes. As you’re working from the underside of the metal plate, the holes in the plate will act as guides, easing the difficulty. Discard the cut out bits unless you are planning to add art under your Semitsu buttons (as I’ve done), in which case you’ll want to refer to this walkthough for details.
Flip the plate over, and trim away any jagged or excess areas along the hole edges, especially around the control and Xbox/options mount area, as sloppy trimming there will be especially apparent.
Position the plate on the joystick case, and carefully peel up one of the upper corners (remember that part about not fastening the edges too firmly?), giving you just enough room to replace the screws. Replace the screws.
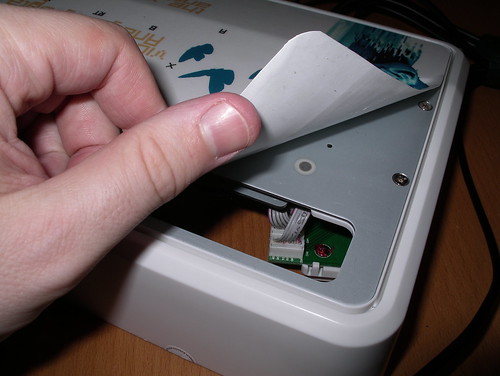
Seal the edges of the art against the plate, taking care to prevent the formation of any new air bubbles.
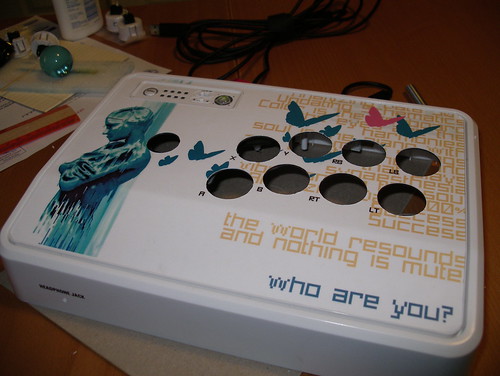
Lastly, replace the innards, post some pictures to the gigantic I love my custom stick gallery, and go play some games!
Reposted for the fine folk over at SRK:
http://forums.shoryuken.com/showthread.php?t=178381
Love what you guys are doing. The add on looks nice.
First, wonderful guide. It seemed like no one else bothered to even care about art on the Fightstick SE, so it’s nice to see someone looking out for us budget guys. =P
Second, if i’m not mistaken that’s Rez artwork you’re using for your stick? If so, you have excellent taste sir! =D
Awesome bro! Great How to, Here’s mine:
http://www.capcom-unity.com/atl_fighter/gallery/view_gallery.one?pid=62510355
Also, where did you get the clear buttons, lizardlick didnt have clear Sanwa buttons? What other model did you use?
Nice art! Looks like the guide button area is a bit rough, but otherwise it’s clean.
I used Seimitsu buttons, we ordered up a batch from Akihabarashop.
Great job on the guide. Does this guide go for the TE stick as well?
Thanks! Actually, the TE stick should be a heck of a lot easier to mod, as that was part of the plan behind its design… I believe replacing artwork on the TE is simply a matter of popping your printed work underneath the acrylic overlay.
Pingback: Madcatz Fightstick Too Drab For Ya? Try This. | Team Teabag! - Home of the Latest Gaming, Technology, and Gadget News, Reviews, and Previews.
very nice work. can u tell me the art mesurements for the SE stick and the TE. thank you for the guide i would realy appreciated.
EXCELLENT guide. This helps a ton bro. Thank you so much, I only have one problem though, how do I use the template you linked us? I downloaded it, but I do not know what to do from there.
Those templates are photoshop files, so you’ll need some way to work with them. If you don’t have any graphic design experience, try corralling a friend that does into helping you out with that part. :]
Pingback: ruizwashere » How to: Give your SE fightstick a personal statement
Pingback: How To Mod The Madcatz Fight Stick with Seimitsu Parts. « Pineconeattack!
Thank you very much for the very detailed post. You solved my problem as to how to print out the paper. The lami-label was amazing at Kinkos, it made the Photo-paper very strong. It was cheap. The kinkos I went to had an issue putting lami-label on black. He ran it through twice through the machine. How many times for you?
Here is a pic of mine:
http://sphotos.ak.fbcdn.net/hphotos-ak-ash2/hs094.ash2/38047_552021454407_198601123_31934495_7221919_n.jpg
Description: Modded Madcatz SE fightstick with [MODDED] Sanwa Joystick and Buttons =D Excellent performance. Just changed the artwork today. :) – Will have to redo, was aiming for Japanese Button Layout, but cut a hole by accident and ended up American Button Layout. Knife wasn’t s…o sharp and some areas as jagged. Will redo sometime soon. :)
What are the exact dimensions of the stick art for this arcade stick in CM?
This is an awesome guide thanks for posting!!!!